


Growing your own is easier than you may think! It is worth the effort, budget-friendly and fun too! Tasting the fruits of your labours and creating new recipes to enjoy can bring a real sense of satisfaction. Here are a few tips and recipes for your homegrown journey.
 Our recipes are based upon our Flavours of Summer featuring in our Summer edition of Cuttings (page 23), where Tomatoes and Raspberries were our chosen specials to savour. Start now and you could be harvesting in autumn fruit and vegetables by late October. For example, Raspberries are in season for harvesting from June, with later varieties from mid-August.
Even a smal l patch can be productive all year round.
A FEW TIPS FOR GROWING YOUR OWN
- Start small and build in space as your confidence grows.
- You can grow your food anywhere – windowsills, raised or flower beds, propagators to greenhouses, and on patios/balconies by using pots, you can grow your food anywhere as long as you have sunlight, a container/area of soil and access to water.
- Start by choosing the fruit and vegetables you love – to begin with ideally choose from the easy starter crops.
- Choose your area or container, ensure there are drainage holes in the latter, and ensure your soil is nice and loose and not compacted – your plants will like to move and grow!
- Maximise your growing space by growing up! Use trellis, cages, wire or string and other supports to train certain varieties of vegetables to grow upwards.
- The cheapest way to grow produce is to start from seed. You should sow them into a fine ‘seed’ compost. Grow them in trays and once a few leaves have emerged, they should be ready to go outside (when there is no risk of frost) or separated into bigger pots indoors. You can also buy starter plants which are more convenient, less risky and will help build confidence for a beginner gardener, and lots of tried and trusted varieties are available. It is slightly more expensive to buy starter plants, but will give some early success.
- Vegetables
Choose a sunny spot, away from trees. Cover with a 15cm layer of compost, tread down lightly and your ready to plant!
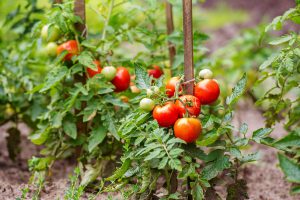
Easy starter crops: Tomatoes *French & Runner Beans * Kale * Courgettes * Lettuce * Chilli Peppers * Baby Leaf Salad * Cucumbers

- Fruit
Fruit bushes don’t demand too much attention and if space is short on the ground, then use your walls.
Blackberries, raspberries and Japanese Wineberries all look great trained up wires. Grow strawberry plants in small pots.
Easy starter crops: Raspberries * Figs * Rhubarb * Japanese Wineberries
For more information on this topic see https://www.coolings.co.uk/how-to/grow-your-own-this-year/
Why not try out some of these Recipes to enjoy your homegrown harvest and taste the fruits of your labours
Blueberry Café Homemade Tomato Chutney
Ingredients:
- 500g red onion, finely sliced
- 1kg chopped tomato
- 4 garlic cloves, sliced
- 1 red chilli, chopped (optional) or 1 tsp chilli flakes
- 4cm piece ginger, peeled and chopped
- 200-250g brown sugar (depending how sweet you like it)
- 150ml red wine vinegar
- 50ml red wine
- 5 cardamom seeds
- 1 tbsp Worcestershire Sauce
- ½ tsp paprika

You will need a large thick based saucepan
- Place all the ingredients into your saucepan and bring to a gentle simmer, stirring frequently.
- Simmer for 1 hr 30 minutes, taste check ensuring the flavour is correct (mainly sweetness and spice)
- Bring to a gentle boil so that the mixture turns dark & shiny with a jam like consistency. Checking not to burn to the bottom of the pan, I recommend a soft spatula.
- Place into sterilised jars and allow to cool before covering.
Your homemade chutney, if stored in a Kilner jar with a flip top lid will last up to 6 weeks!
- 1 large onion, diced
- 1 carrot, finely chopped
- 1 stick celery, finely chopped
- 50g butter
- thyme, 3 sprigs, remove leaves from stalk and roughly chop
- 500g of tomatoes, roughly chopped
- 850ml chicken stock
- 8 tbsp crème fraiche
- Few leaves of basil (optional)
- Salt & Black pepper to season

You will need a large thick based saucepan
- Sauté the onion, carrot and celery in the butter for 8-12 minutes until really soft. Add the herbs (remove the thyme from stalks) and cook for a minute then tip in the tomatoes and stir in the chicken stock. Stir thoroughly, cover and simmer gently for 30 minutes. Remove from the heat and add half of the crème fraiche then use a stick blender or put the mixture into a food processor and blend until completely smooth.
- Season with black pepper & salt to taste, then ladle into bowls, add a spoon of crème fraiche, a couple of basil leaves and half cut vine tomatoes to garnish if desired.
Your homemade soup can be stored in an airtight container in the fridge, once cooled, and will keep up to 1 week in the refrigerator or 6 months in the freezer. Rewarm to serve. Fully defrost first from freezer.
Cheesy Tomato Scones
Ingredients to make 6-7 scones:
- 250g self-raising flour
- 60g unsalted butter, cold, cut into cubes
- 55g cheddar, grated
- 90g tomatoes, roughly chopped, plus extra to serve (optional)
- 40g sundried tomatoes, chopped
- 1-2 thyme sprigs, leaves removed from stalks & roughly chopped
- ¼ tsp salt
- 100ml whole or semi-skimmed milk (or oat milk)
- 1 tsp Dijon mustard or English mustard for a bit of heat!
- 1 egg, beaten
- butter, to serve if desired

- Preheat the oven to 200C/180C fan/gas 6. Line a large baking sheet with baking paper.
- Put the flour and butter into a large mixing bowl and rub butter & flour between your fingertips until the consistency of fine breadcrumbs (you can use a food processor for this step!)
- Add the cheese, all the tomatoes (use kitchen towel to soak up the oil from sundried tomatoes), thyme and salt and mix.
- In another bowl, whisk together the milk, egg and mustard. Keep a small amount aside for brushing over the scones prior to baking. Add the remaining to the dry mixture and fork mix to form a loose dough.
- Dust a worktop or marble board with flour and tip the dough out onto this, roll out until around 2-3cm thick. Using a circular cutter cut out as many rounds as possible and place evenly space on the baking sheet. Push the off cuts together and gently re-roll and repeat until all used up.
- Brush the top of the scones with the set-aside milk mixture. You can sprinkle on extra cheese on top if desired.
- Bake for around 20 minutes or until crisp and golden and risen. Take from oven and cool on a wire rack.
Scones, once fully cooled, can be put into an airtight container and keep for 2 days, or pop into a freezer bag or the airtight container and freeze for up to 3 months. Refresh in a warm oven.
Raspberry Ripple Ice Cream
Ingredients:
- 300g raspberries
- 397g condensed milk
- 600ml double cream
- 2 tsp vanilla extract

- Place the raspberries in a deep bowl and squash down with a fork until soft and runny. With the back of a spoon, press the mashed raspberries through a sieve into another clean bowl, leaving the seeds that remain in the sieve.
- Place the cream, condensed milk and vanilla extract in a separate large bowl and whisk thoroughly with an electric mixer until soft peaks form.
- Spread a quarter of the cream mixture into a freezer-proof dish or recycled ice cream tub. Drizzle a third of the raspberry mixture on top, followed by another quarter of the cream over the raspberries. Repeat this until all the mixture is used up, ensure to finish with a layer of the cream. Drag a skewer or knife through the mixture, up and down the container several times to create a marbling in the mixture – don’t overdo it though!
- Cover with a lid and freeze for at least 6 hours or overnight, until the mixture is firm to touch. To serve, transfer to a fridge to soften for 15–30 minutes beforehand. Serve with further fresh raspberries and/or meringues for a lovely summer dessert.
Raspberry Chocolate Brownies
- 300g chocolate (you can use a combination of white, milk and/or dark)
- 250g butter
- 400g soft light brown sugar
- 4 eggs
- 140g plain flour
- 50g cocoa powder
- 200g raspberries

- Heat oven to 180C/160C fan/gas 4. Very lightly grease a traybake tin and line with greaseproof paper.
- Place a saucepan onto the heat and place the the chocolate, butter and sugar and gently heat, stirring occasionally with a wooden spoon until melted. Remove from the heat.
- Whisk the eggs with a fork and gradually tip into the chocolate mixture, stirring continuously. Sieve the flour and cocoa into this mixture and stir to combine. Add half the raspberries and stir in gently.
- Tip mixture into the baking tray, scatter the remaining raspberries over the top.
- Bake in the middle of the oven for 30 minutes and then remove to check firmness, it should be soft to touch. If prefer a firmer texture, put back in the oven for 5 more minutes. Cool before slicing into squares. You can store in a tin or airtight container up to 3 days – if they last that long!